Implementation
The repository is organized into the following directories:
lime_tbx: The
lime_tbxPython package containing the LIME Toolbox.test_files: Data files used in automated tests for
lime_tbx.coeff_data: LIME coefficients and related files.
eocfi_data: Ephemerides, geometries and other data used for EO-CFI satellite computations.
kernels: SPICE toolkit kernels.
deployment: Files and scripts needed to perform the deployment process, which generates installers for different operating systems.
docs: Documentation for both users and developers.
Ancillary Data Files
LIME Toolbox relies on various data files to compute geometries, coordinates, satellite positions, and the LIME model. Some of these files are stored in the installation directory, while others reside in the appdata directory (see Configuration and Logging).
Files and directories in the installation directory cannot be modified by the toolbox due to restricted write access without admin privileges, therefore the appdata directory is used for files and directories that require modification. If the toolbox is not installed, it defaults to using the current working directory as both the installation and the appdata directory.
LIME Coefficient Files
LIME coefficient files are located under the coeff_data directory, in the appdata directory. This directory contains:
coefficients_server.txt: Text file with the URL where LIME coefficient files can be downloaded.
selected.txt: Text file with the name of the last selected coefficient file, ensuring persistence across sessions.
versions/: Directory containing all downloaded LIME coefficient in netCDF format. The exact format is described in Table 1.
Variable |
Dimensions |
dtype |
|---|---|---|
coeff |
|
float64 |
u_coeff |
|
float64 |
err_corr_coeff |
|
float32 |
dolp_coeff_pos |
|
float64 |
u_dolp_coeff_pos |
|
float64 |
err_corr_dolp_coeff_pos |
|
float32 |
dolp_coeff_neg |
|
float64 |
u_dolp_coeff_neg |
|
float64 |
err_corr_dolp_coeff_neg |
|
float32 |
wavelength |
|
integer |
Table 1: LIME coefficients netCDF file format.
EO-CFI Data Files
LIME Toolbox uses the EO-CFI libraries to compute satellite positions. These computations require data files in one of the following formats:
Orbit Scenario Files (OSF)
Three-Line Element Set Files (3LE/TLE) These files are located in the
eocfi_datadirectory within the installation directory, which contains two main elements:esa_sat_list.yml: A YAML file listing all available satellites and their associated data files. Satellites can be defined using OSF or 3LE files, with format details provided in Table 2.
data/: Subdirectory containing all the referenced OSF and 3LE data files in
esa_sat_list.yml.
LIME Toolbox allows users to add satellites if they have the necessary data files.
Since installation directories cannot be modified, a separate eocfi_data directory is created in appdata, following
the same structure.
If a satellite appears in both directories for the same date and time, appdata takes priority.
Attribute |
Description |
OSF/TLE |
|---|---|---|
id |
Satellite ID number (see EO-CFI GeneralSUM manual, Section 7.2). |
Both |
n_files |
Number of orbit files listed. |
Both |
orbit_files |
List of file paths for each data file. |
Both |
norad_sat_number |
NORAD satellite catalog number. |
TLE |
intdes |
International Designator string. |
TLE |
timefile |
OSF file used for time equivalence calculations. |
TLE |
Table 2: esa_sat_list.yml satellite attributes.
SPICE Kernels
The SPICE toolkit enables LIME Toolbox to compute geometries and coordinates. It requires access to kernel files, which contain essential data such as geometries, ephemerides, and reference frames.
These kernel files are stored in the kernels directory within the installation directory.
Configuration and Logging
LIME Toolbox simulations can be customized by the user. For example, the interpolation reference can be set to ASD spectra (preferred) or Apollo 16 + Breccia. Configuration is managed through a YAML configuration file.
The Toolbox also logs error, warning and debug messages into text files within the logging directory.
Both the configuration file and the logging directory are stored in the LIME Toolbox appdata directory, which varies depending on the operating system when the toolbox is installed:
Windows:
%appdata%\LimeTBX\Linux:
~/.LimeTBX/Mac:
~/Library/Application Support/LimeTBX/
If the toolbox is not installed, it will default to using the current working directory as the appdata location.
Configuration File
The YAML configuration file defines various attributes for customizing simulations:
interpolation_SRF (
str) – Spectral Response Function of the TSIS-1 Hybrid Solar Reference Spectrum.interpolation_spectrum (
str) – Spectrum used as the interpolation reference for reflectance.interpolation_spectrum_polarisation (
str) – Spectrum used as the interpolation reference for polarization. Note: This value cannot be modified via the UI yet, as only Linear is currently valid.show_cimel_points (
bool) – Whether CIMEL anchor points should be plotted (true/false).show_interp_spectrum (
bool) – Whether the interpolation spectrum should be included in the output plot (true/false).skip_uncertainties (
bool) – Whether to skip uncertainty computations (true/false). Note: Uncertainty calculations are the primary performance bottleneck in LIME Toolbox simulations, so disabling them significantly increases speed.use_wehrli (
bool) – Whether to use TSIS-1 HSRS (false) or Wehrli (true) as the solar spectrum. Note: This setting cannot be modified via the UI and it’sfalseby default.
This file is loc located in the appdata directory, under a directory named coeff_data.
Logging
By default, LIME Toolbox logs at the INFO level. To enable DEBUG logging, set the environment variable
LIME_DEBUG to DEBUG.
Deployment
The deployment process involves compilation, building, and packaging to generate installers for various operating systems. It is carried out using:
All required files are under the deployment directory, which contains:
installer/: Scripts and configuration files for manually building and packaging installers.
automatic/: Dockerfiles and scripts for automating the build processes carried out in
installer/.
Manual Deployment
The deployment/installer directory contains scripts and configuration files to build production-ready
installers. These installers are OS and machine-dependent, so it’s recommended to use
automated deployment whenever possible, whioh is explained in Section
Automated Deployment.
Requirements:
Python 3.10.
pyinstallerinstalled outside of the virtual environment.
1. Compile C code for EO-CFI
This step compiles a small C program with the EO-CFI libraries to generate a binary required by LIME Toolbox. This is only needed if the C source code has been modified, the EO-CFI libraries have been updated, or the binary does not work on your system.
In Linux or Mac:
cd lime_tbx/business/eocfi_adapter/eocfi_c
cp MakefileLinux Makefile # Linux
cp MakefileDarwin Makefile # Mac
make
In Windows:
cd lime_tbx\business\eocfi_adapter\eocfi_c
copy make.mak Makefile
nmake
2. Build the Python Package
Building the .egg-info directory is needed so PyInstaller is able to read the metadata
from it when packaging the toolbox. For that, the easiest way is to build the package:
python3 -m build
3. Create a Virtual Environment
To minimize application size it’s strongly recommended to use a virtual environment (venv) :
python -m venv .venv
source .venv/bin/activate  # For Linux/Mac
.venv\Scripts\activate     # For Windows
pip install -r requirements.txt
pip install PySide6~=6.8   # Use PySide2 for older OS versions
4. Build the App Bundle
Use pyinstaller to create an executable bundle for your OS:
pyinstaller lime_tbx.spec
Once the build is complete, deactivate the virtual environment.
5. Create an Installer
Navigate to the deployment/installer directory and use the appropriate method for your operating system:
Windows: Use “InnoSetup” and run
inno_installer_builder.iss.Mac: Run
build_mac_installer.sh.Linux: Run
build_linux_installer.sh.Debian: Run
build_deb.shafter building the Linux installer.
Automated Deployment
The deployment process is automated using Docker. It requires building the Docker image once, and then running it each time the app is deployed.
Linux Automated Deployment
Build the image:
cd deployment/automatic
docker build ../.. -t lime_compiler -f Linux.Dockerfile
Run the container and deploy the app:
docker run -v $(dirname $(dirname $(pwd))):/usr/src/app/repo lime_compiler
Windows Automated Deployment
Windows automated deployment is only available via Docker for Windows and does not include the EO-CFI C code compilation step. If EO-CFI libraries have been updated, refer to Manual Deployment - Step 1.
Build the image:
docker build .. -t lime_compiler -f Windows.Dockerfile
Run the container and deploy the app:
for %F in ("%cd%\..") do set dirname=%~dpF
docker run -v %dirname%:C:\repo lime_compiler
Mac Automated Deployment
Automated deployment on macOS is partially supported, but cannot be containerized like on Linux due to macOS container limitations: Docker does not support macOS as a guest OS.
However, deployment can still be automated using native macOS tools or CI platforms like GitHub Actions with macOS runners (planned for future improvements).
In the meantime, the recommended manual approach is to use a local macOS environment with the official Python 3.10 (via Homebrew), not the system-provided one.
Install Python 3.10 via Homebrew (avoid system Python):
brew install python@3.10
Install required Python tools:
python3.10 -m pip install pyinstaller build
Run the macOS build script:
./deployment/automatic/mac_build_script.sh
⚠️ Make sure you are not using the system Python (e.g.,
/usr/bin/python3), as it lacks proper OpenSSL support and can cause issues with PyInstaller builds.
Code Quality
Maintaining high code quality is essential for the reliability, maintainability, and performance of the LIME Toolbox.
To ensure a robust and well-structured codebase, we follow best practices in code formatting, static analysis,
testing, and documentation through an automated Continuous Integration (CI) pipeline.
Currently, CI is defined in .gitlab-ci.yml, running automated checks on every commit.
In the future, this pipeline will be migrated to GitHub Actions and defined in .github/workflows/ci-pipeline.yaml.
Code Style and Static Analysis
LIME Toolbox enforces strict code quality standards through automated formatting and static analysis tools, ensuring consistency and reliability in the codebase.
 - Automatically formats code to
ensure consistency with PEP 8 and PEP 257.
- Automatically formats code to
ensure consistency with PEP 8 and PEP 257. - Performs static code analysis to
enforce best practices and detect potential issues.
- Performs static code analysis to
enforce best practices and detect potential issues.- Checks type annotations to improve code clarity and catch type-related errors early.
These tools run as part of the CI pipeline for every commit to ensure every branch meets our quality standards before being merged. Developers are encouraged to run these tools locally before pushing changes to streamline the development process.
Testing
The lime_tbx package is validated through a suite of 260 unit tests. These tests run automatically
whenever the code changes, ensuring stability and preventing regressions.
LIME Toolbox uses the following tools to manage and execute tests:
- The built-in Python testing framework used for defining and structuring test cases.
 - A more powerful test runner that
provides enhanced test discovery, fixtures, and assertions.
- A more powerful test runner that
provides enhanced test discovery, fixtures, and assertions. - A testing automation tool used to run tests in
isolated environments, ensuring compatibility across different Python versions.
- A testing automation tool used to run tests in
isolated environments, ensuring compatibility across different Python versions.
Currently, testing is executed via GitLab CI Pipelines, with plans to migrate to GitHub CI in the future.
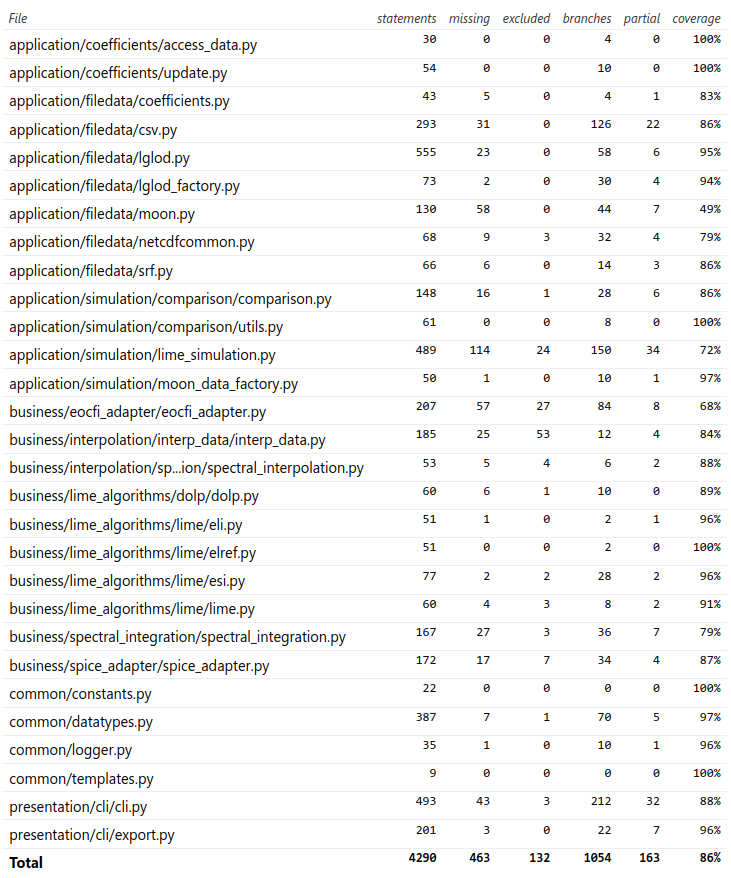
The current test coverage is approximately 86%, as shown in Figure 2.
Code Documentation
LIME Toolbox follows the Numpydoc standard for docstrings, ensuring clear and structured documentation across the codebase. For details, refer to the Numpydoc style guide.
To maintain high-quality documentation, lime_tbx enforces a minimum documentation coverage threshold
into the CI pipeline using interrogate. The current threshold is 65%, excluding the lime_tbx/presentation/gui
subpackage. Future improvements will raise this threshold and extend coverage to all subpackages.
By automating documentation coverage checks, lime_tbx ensures maintainability and accessibility,
keeping the project well-documented for both developers and users.